I have several affiliate links in both my posts and on the sidebar. All opinions are mine! Thanks so much for your support.
Showing posts with label my designs. Show all posts

Thursday, December 19, 2013

Homemade Vanilla.. (and free labels)

If you have never tried homemade vanilla extract, you don't know what you are missing. If well-made (more on that later) it is fabulously better than any store bought (especially the imitation of course!) I made vanilla extract last year for the first time and perfected my technique. I made about 32 oz. this year for gift-giving to my co-workers and friends.

The most important things to know about making vanilla is the concentration (ratio of beans to alcohol) and the time needed for extraction. I used the information from here for the recipe.  It is important to remember that it cannot be called "extract" (by FDA designation) unless there is at least 0.8 oz of vanilla per cup of alcohol (you must use alcohol in order to extract the favor from the bean. But remember that the alcohol bakes off leaving just the flavor behind). I used 1 ounce of beans per cup of vodka, which is slightly more than the required amount.  I aged it for more than 6 months to extract all the vanilla flavor before decanting into bottles.
The very best instructions and information for making vanilla is found on the Vanilla Review blog, so be sure to check it out. I purchased my vanilla beans from Vanilla Products off ebay, just be sure to get Grade B (extract) beans. I tried Grade A, and they did not extract as well. The beans were soft, supple, with a wonderful fragrance, and easy to cut.
You might recognize these bottles, I ...ahem... "recycled" them from Cracker Barrel (they originally had syrup in them). Ask nicely and leave your waitress a generous tip! I ran them through the dishwasher, removed the labels (Goo Gone is your friend here) and then ran them through the dishwasher again.

I also purchased these 2 oz. Boston Round bottles from Amazon but had to use the CB bottles when I ran out of the purchased ones. They are slightly bigger than the CB bottle (2 oz instead of 1.5 oz), and need no prep before use (although I did run them through the dishwasher as well).
On to the labels. I designed these in Make-The-Cut and designed a non-personalized version for you as well. Even if you do not own a cutting machine, MTC is the easiest and most intuitive program for this kind of designing. Way, way easier than Adobe Illustrator. I cannot recommend it any higher. I am an affiliate so check out my link (see sidebar) if you want to try it. You can download it and try it for free to see how it works (It is fully functional other than it cuts a diagonal line though the cuts until your purchase it. You also cannot save to the different formats).
Here's a screen shot of the labels I designed for you. In case you don't have a cuttting machine, they are designed to be used with the Fiskars X-large Oval Punch.
In order to protect the label from dripping vanilla, I covered it with a glossy clear covering (The Duck brand that I found was clear and glossy. Clear Contact paper is matte and frosted, it will work but is not as professional looking).  The covering made them a bit thicker but I was able to punch them out without too much pressure.   I used my ATG gun to attach these to the bottles but any permanent adhesive will work.
You can see the clear covering in this photo. And you can download the non-personalized labels here for the next few days.
I also designed (in MTC again) a round gift tag. I have a non-personalized version for your use as well if you would like to download it (free until the end of the year)!  I drew in the holly and berries on mine but added a printed one for you. I found the holly image (free) here. I traced it in MTC to get solid colors.
Punch holes for the cord (I used a Fiskars hand punch that makes two holes but I can't find a link to it), attach with elastic cord...
or baker's twine (which is easier than the elastic cord).
Place in plastic bags (I used these and they fit perfectly) and tie with a festive yarn.        
  And you are all ready for gifting! 

(Although I have provided affiliate links for the supplies, I actually purchased most of my supplies locally at WalMart, Michaels or JoAnns. I did not receive any free supplies. Links are provided for those who cannot find them locally.)

Monday, July 4, 2011

Free Border file - Entwined arches

Here's another border file for you. I designed this one in MTC but have not cut it yet. It has several different variations. Let me know if there are any problems with it.
Thank you to those who have made purchases at Lettering Delights through my links. It has really helped out and I appreciate it. I appreciation, I will continue to provide free files here for you as well. Enjoy and as always, I would love to see some of your projects with these files.

Download file here or click image above.

Friday, July 1, 2011

Circle Border

This is a simple circle border with corners for you to use.
For the file, click on image above or here.

Wednesday, June 29, 2011

Gerber Daisy Border (free)

Another border to add to your collection. This one also includes a lace that can be threaded with a ribbon.
You can download the file here.

And there is an awesome bundle deal at Lettering Delights for their Two for Tuesday deal.. If you do not already have these sets, check out this great deal. It is a bundle worth $44 for just $5 until July 4. Check it out  (image below if linked).

Tuesday, June 28, 2011

Update for the border file - corner added

I finished the corner for the arched border file that I had previously released here. You can easily adjust the length of the border as needed.
The file can be downloaded here or by clicking the image above.

Thursday, June 2, 2011

A Melon Thanks! (and a free texture)

OK, I admit that I love puns! And since I had this pun in mind, when I saw the new Backyard Fun graphic set and the SVG set at Lettering Delights, I knew I had to make another card using it.
 I used the HP Premium Presentation Paper that I bought on sale at Best Buy last week. The paper handles color graphics awesomely - these pictures are straight out of the camera (they were resized) - no photo-shopping needed to get that vibrant color. Since this is a heavy paper - but not thick enough for the card base - I had 2 cut pages. Here is what the MTC page looked like, ready to print to the HP paper (of course I turned off "Outline shapes" for printing):
Yes! I even made watermelon seeds. They turned out great - don't you think they look like real seeds?
After cutting, the seeds I drew over them with my new Atyou Spica Clear twinkle pen, then dolloped them with Dimensional Magic.  Then I cut the base out of plain white Georgia Pacific card stock. Both papers cut very well on the Silhouette.
Layering was easy - the watermelon and the Thanks! were popped up with foam squares. So pop on over to Lettering Delights to pick up one or both of these sets. You might want to check out the other new SVGs while you are there.
The green polka dot texture is on my own design and I am happy to share it with you. It is small enough to be used in MTC without slowing down your system. Download here

Thursday, April 28, 2011

We all live in a yellow submarine...

I'm a star! Well, not really but I have my head dubbed over Ringo Starr's head on a video and I feel like a star. This video is for Nurses' Day (May 6) and was taped this last month. I hope to be able to share it with you soon.  But that brings me to this card... the song we lip-sync'd to (different lyrics of course) was "I Want to Hold Your Hand" by the Beatles. The Beatles...Yellow Submarine...and I needed a Thank-You card for the videographer. So of course, it had to be the yellow sub from the Seven Seas graphic set at LD.

I designed and printed this card in Silhouette Studio, and designed the envie in MTC. Because I will hand deliver the envie, I could decorate the front of it as well.  The picture above shows the back flap. Here is the front of the envie:

I brought the image into Silhouette Studio, shadowed it at 0.125 for the blue, then again at about 0.150 for the base. I duplicated the bigger shadow, flipped it horizontally and welded it to the other for a base. The submarine is popped-up on the front. The saying goes on the left inside, with the remainder of the card left for signatures. The screen looked like this when I was ready to print and cut:

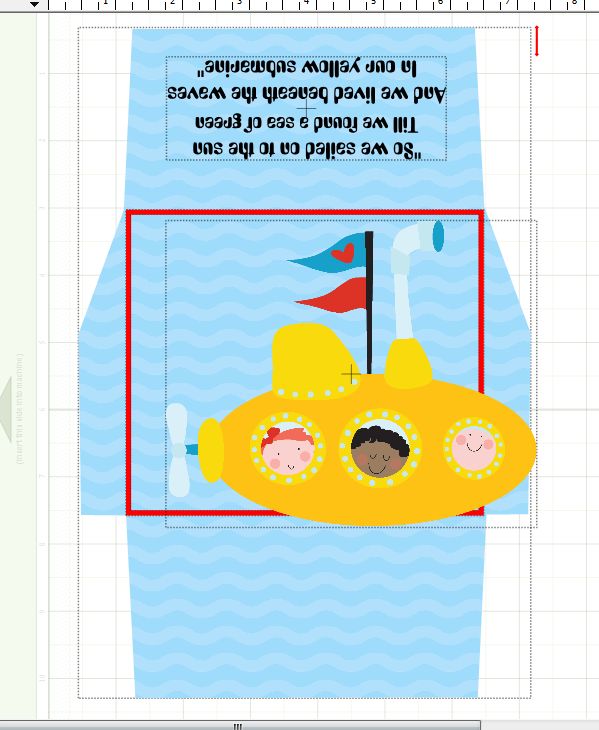
Here is the screen shot from MTC for the envie before printing:
I used the font "Yellow Submarine", free from dafont. It unzips to be called Beatles.

Hope you enjoy this card! I love the bright colors and retro feel of it. If you don't already have it, you can grab this set for $1 (or the SVG for $2) while they are on sale - only 1 more day left!

Wednesday, April 27, 2011

My favorite little monster

OK, I guess I am on a roll making cards for boys! This little monster was found here (along with lots of other files!) and I could not resist turning him into a card for my favorite little monster. My friend's three-almost-four (in one month) year old son asked her why he didn't get any mail - so this little guy is all set to go out to Caiden soon. Hey Buddy, you've got mail!
Love those little chompers! I am thinking of adding googly eyes to him as well but I am not sure how it will stand up to mailing and he's awful cute like he is.

I used both MTC and Silhouette Studio for this project. I started out with the image, brought it into MTC to break and color. I applied a texture to the sky and plain colors elsewhere. When I was finished my MTC screen looked like this:

I selected all and exported to png. I brought the png into Silhouette Studio, did some shadowing for the sentiment and made a base to fit the image with two "round rectangles" (that's what SS calls them) welded together.  I added an extra monster so I could pop him up on the card. Here is what my SS screen shot looked like when ready to Print-n-Cut:

From here it was all PnC in Silhouette Studio. I designed the envie in MTC and added a twist by having the image on the back of the envie line up. You can see it here:
and here with the flap open slightly:

You can also see the banding on my printer (almost time for a new print head). It does not do this with the photo paper, only on copy paper. And BTW, here is a good example of the difference between the two different types of paper, coated and uncoated inkjet paper. The envie is printed on 24# Premium Inkjet Paper (with color lok) and the card is printed on Royal Brites Matte Photo Paper (9 mil, or 200 gsm, I think that works out to about 53 #). The coating on the Royal Brites makes that much of a difference!  (photo is unaltered other than cropping and lowered screen resolution)

I really am not comfortable sharing the MTC file with the graphic (the site states that the images are "property of Activity Village and are for personal, classroom and library use only") but I can share the MTC envie file without the image, click here. And you can pick up the image for free from the above site. So go make some little monsters!

Friday, April 8, 2011

Easter Treat Holder

I made this cute little Treat holder, and embellished it with the lamb from Sheepy to personalize it for Easter. These will be for the Sunday School kids, they will make the craft and then we will add the treat for them.
These are made dimensional by the addition of pop-ups for the hair and the hooves (hoofs?).

 You can download the MTC file for the treat holder here and the purchase the Sheepy graphic set here (image is linked as well).
FYI: I also altered the sheepy by removing the bow in PSE so that it was not so girlish. 

Thursday, February 3, 2011

Card with Lettering Delights DB Floragraphy font.

I've been wanting to create some cards with the DB Floragraphy font from Lettering Delights for a while. I needed to make some cards for a co-worker so I finally got around to designing some cards.
I wanted to make these without micro-managing the alignment for print and cut so I used a 0.125 shadow (1/8") around each shape and then just placed it on my mat and cut on my Cricut. It worked great! No worry about getting it aligned just right, there is enough fudge in the design that it cuts right on! 

Here is a screen shot of the design (with shadow, I checked "outline shapes" so you could see the shadow - be sure to un-check it before printing). I used textures from the Love is Sweet Background Paper Set (from LD of course and on sale right now!)  The font for "Missing you..." is LD Cotton Candy (also on sale).

Here is what it looked like after printing....
....after cutting........
.....and final card:

Thursday, January 6, 2011

MTC cut file for the Target Mailboxes

Hey! It's that time of the year - head off to Target to get your annual fix of their $1 mailboxes.  They are out just in time for Valentine's Day!  So today I have for you a MTC file for covering the mailbox.

Every mailbox is just a little different but this cut fit mine almost perfectly. You will still need to make a slit from the edge into the circle.  I had the cut there but it cut roughly so I removed it. This file fits on 8.5 x 11 paper and has an extra piece (the rectangle in the lower right) to cover the bottom of the mailbox.
Grab the file from my PogoPlug or Box.net.

For a tutorial on how to cover, just do a quick search on youtube - there are several videos out on assembly. Here's just one: http://www.youtube.com/watch?v=8LwRRSrFwYw&feature=related  (it uses a DS cut file, but same principles).

Tuesday, January 4, 2011

Pickett Fence border file

I've been drooling over the Martha Stewart Pickett Fence border punch but have never been able to find it at a convenient time or price.  So I decided to design my own in MTC, and post it here for your to share.  I would love to see your cards or designs done with it!  I also added a grass file to go with it. Enjoy!
I have several different variations, the one shown above is 03. Click the images to download through my PogoPlug or see the links to Box.net below.

(Design 01 above)

(Design 02 above)
From Box.net: Design 1, Design 2, Design 3

Friday, December 31, 2010

Engagement card

My girlfriend's daughter just got engaged.  She really likes the Victorian style so I made this up for her engagment card. 
I popped out the figures with pop dots, although it is a little hard to see.  
UPDATE: her wedding colors are black, red and white so I had to add some red.  I (carefully!) pulled off the figures and added a strip of red to the card. Here is what it looks like now: 
The inside has another image. 

Thursday, December 30, 2010

Cards and a MTC border file

Feeling like I am over winter already.  I know, I know, it barely started. So I decided to herald the hoped-for spring by making some spring cards.


I found these lovely card blanks at Michaels (8 for $1) and just couldn't pass them up!  Here are 2 of the cards.  I used a Martha Stewart border punch and thought, "Hey that would be easy to make in MTC!" So a border punch file for you to try!


Here are the bare cards, ready for decoration and creativity!


So the first one was made with the punch and a Letter Delights graphic (one of the free ones that you can download here).  Blinged it out with glitter pens.  It's a little hard to see the bling but it is there!
 The second is very simple - just a bow and sticker.  But I like simple. 
Here is the border punch file for you (can also click on the image) or from box.net here