Just to prove that I did manage to get the tiles sealed, I have a picture for you. I used a gloss varnish so they are all ready to go - just need to be wrapped by the girls. In case you missed the post about making the tiles you can read it here.
I was planning on using this bag but the tiles are just a bit too big so I adapted that file for the tiles. We will wrap them in tissue paper and then top the wrapping with this.
The idea is that they will be able to write something on the handkerchief tag and tuck it into the pocket.
The pockets are held in place with tabs that allow it to slip into the shirt.
I have a free MTC file for you if you would like to recreate something similar.
Download the free MTC file here through the end of the month.
I have several affiliate links in both my posts and on the sidebar. All opinions are mine! Thanks so much for your support.
Saturday, June 16, 2012
Sunday, June 10, 2012
Photo Coaster tiles (what the Pink Girls made for their Daddies for Father's Day)
Time is running out! Father's Day is next Sunday and I am off to Chicago-land this week (a sister hospital is changing to a new EMR and I am a Super User for the system so I will be there to help out with the GoLive) so I can not work with the Pink Girls with crafting on Wednesday after church. So I hurriedly revived this old craft for them, took pictures of them this am, and had them write their comments this pm at church (One Pink Girl is missing - if you do not come to Sunday School = you do not craft with Nelda. Moral of the story: do not skip Sunday School!) I will actually be doing most of the crafting this time around because of my trip out-of-town.
I picked up these tiles previously on clearance at Lowes . I have found (like another blogger stated) that Lowes have the best selection of tiles and the lowest prices - at least for what I am looking for. I checked both Menard's and Home Depot as well. These gold tiles were on clearance for 0.10 each, they normally run about 0.34 each - still a cheap project. I liked the beige ones best but it was too hard to pass up on the clearance so that is what I used for this project. (and the gold matched the background better as well). I really like the edging on these tiles, I think it is uber cool looking! Like we chiseled it out of stone or something just for the daddies.
Here are the scu numbers in case that helps you. I am not sure that the gold ones are still available though.
Take your pictures and print them out using whatever program you have. I used PSE and cropped them to 4" x 4" then printed on regular thin printer paper. Let them dry until the paper will tear well. Tear, burn or cut around the edges just a bit smaller than the size of the tile itself - whatever floats your boat. I tore. It is sometimes hard to tear well - but that is part of the charm so just make it look good to you. The person here did some cutting and inking.
Put glue on the back (I did not use Mod Podge but you could). I found that a thin layer worked best for me but give it a try and see what works best for you. Too much glue made my paper wavy to I tried to be a bit stingy with it. Apply photo to tile, centering as you desire.
WAIT UNTIL IT DRIES COMPLETELY.
Otherwise the next step will not go well. Ask me how I know.
Have your Pink Girl use a PERMANENT marker to add a sentiment for her daddy. Mistakes, misspelling and all, he will love it. And as you can see here individuality is not a desired trait for this group! They are a clique of their own and dare not break form from each other! So a bit of copying is OK, just make sure it something from their heart. And they have varying degrees of legibility as well - the best cursive writer here is actually the next to the youngest. And the only one not home-schooled. (I am not against home-schooling per se but I'm just saying that there may be some positives about schooling in a structured environment.)
And BTW, I did not pose them for the pictures above, they posed themselves. And they were against the same background, same lighting, photos taken within minutes of each other and yet the background looks completely different in each photo, what's with that?
Let the marker dry well. Now add some felt pads (I got the small dark brown ones at the Dollar tree and the larger ones at Walmart) to the corners.
The adhesive is not perfect so you might want to add a touch of tacky glue or hot glue to secure the felt well. Ask me how I know.
Now spray the front with a clear adhesive - this sets the printer ink so that it does not smear. When dry, coat with either more spray adhesive or a brush-on sealer (you could use Mod Podge, I will use Triple Thick). I don't have pictures of this because I have not done it yet! I always do 2 coats of Triple Thick and I like to let it dry a week before use. It will be dry on the surface but maybe not all the way through so give it some time. You are then ready to wrap and gift!
Of course, now my project will not fit in the bag that I had already designed for them (I was considering photo buttons and that bag was a perfect size for them). So now we need a new wrapping solution!
I picked up these tiles previously on clearance at Lowes . I have found (like another blogger stated) that Lowes have the best selection of tiles and the lowest prices - at least for what I am looking for. I checked both Menard's and Home Depot as well. These gold tiles were on clearance for 0.10 each, they normally run about 0.34 each - still a cheap project. I liked the beige ones best but it was too hard to pass up on the clearance so that is what I used for this project. (and the gold matched the background better as well). I really like the edging on these tiles, I think it is uber cool looking! Like we chiseled it out of stone or something just for the daddies.
Here are the scu numbers in case that helps you. I am not sure that the gold ones are still available though.
Take your pictures and print them out using whatever program you have. I used PSE and cropped them to 4" x 4" then printed on regular thin printer paper. Let them dry until the paper will tear well. Tear, burn or cut around the edges just a bit smaller than the size of the tile itself - whatever floats your boat. I tore. It is sometimes hard to tear well - but that is part of the charm so just make it look good to you. The person here did some cutting and inking.
Put glue on the back (I did not use Mod Podge but you could). I found that a thin layer worked best for me but give it a try and see what works best for you. Too much glue made my paper wavy to I tried to be a bit stingy with it. Apply photo to tile, centering as you desire.
WAIT UNTIL IT DRIES COMPLETELY.
Otherwise the next step will not go well. Ask me how I know.
Have your Pink Girl use a PERMANENT marker to add a sentiment for her daddy. Mistakes, misspelling and all, he will love it. And as you can see here individuality is not a desired trait for this group! They are a clique of their own and dare not break form from each other! So a bit of copying is OK, just make sure it something from their heart. And they have varying degrees of legibility as well - the best cursive writer here is actually the next to the youngest. And the only one not home-schooled. (I am not against home-schooling per se but I'm just saying that there may be some positives about schooling in a structured environment.)
And BTW, I did not pose them for the pictures above, they posed themselves. And they were against the same background, same lighting, photos taken within minutes of each other and yet the background looks completely different in each photo, what's with that?
Let the marker dry well. Now add some felt pads (I got the small dark brown ones at the Dollar tree and the larger ones at Walmart) to the corners.
The adhesive is not perfect so you might want to add a touch of tacky glue or hot glue to secure the felt well. Ask me how I know.
Now spray the front with a clear adhesive - this sets the printer ink so that it does not smear. When dry, coat with either more spray adhesive or a brush-on sealer (you could use Mod Podge, I will use Triple Thick). I don't have pictures of this because I have not done it yet! I always do 2 coats of Triple Thick and I like to let it dry a week before use. It will be dry on the surface but maybe not all the way through so give it some time. You are then ready to wrap and gift!
Of course, now my project will not fit in the bag that I had already designed for them (I was considering photo buttons and that bag was a perfect size for them). So now we need a new wrapping solution!
Saturday, June 9, 2012
Dollar Days and Deals for Dads
Dollar Days for files related to boys or dads - about 400 files in all!
So hop over and see what they have that you may be able to use - at this price you'll want to grab them while you can (image above is linked). Don't forget to pick up some files for your Father's Day projects.
Friday, June 8, 2012
Tuesday, June 5, 2012
Getting ready for Father's Day
I'll be doing some crafting with The Pink Girls for Father's Day - just not quite sure yet what. But I did get started with the gift bag. I saw
these on Pinterest and decided to design my own in MTC. But before I could, angelb (from the MTC forum)
posted one that she was sharing. But I needed one more proportioned like a lunch bag, so I went ahead and designed my own. My bag is 3.5 x 4.75 x 1.5" (w x h x d).
OK, a little bit of cheatin' goin' on here - I wanted the design to be as big as possible on an 8.5 x 11" paper so I did not want to use PnC (the reg marks really eat into the design area).
So I made my design and then made a thick shadow around it and filled it with a pinstripe texture (that I designed and is included in this file). I kept the actual cuttable design white. Using this method you may even be able to get a decent Print-n-Cut with a cricut. I can assure that it works very well to get a larger design with a Cameo!
I drew the ties myself - I started with the pentagon shape and then did some node-editing magic (thank you so much, Andy, for adding node editing to MTC!) and voila! a tie appeared. I wanted it to be proportional so I actually designed it on the front page and then moved it to the second page for PNC (in the same cheatin' way!). I even cheated and punched out the tie tacs (the round things) with a punch - shame on me! (I found the saying "World's Best Dad" on google. I was not able to find any copyright info so I am not including it in the file. You can always make up your own or google it yourself).
I took the image into PSE and changed the light teal blue to a blue that matched my bag and tie better.
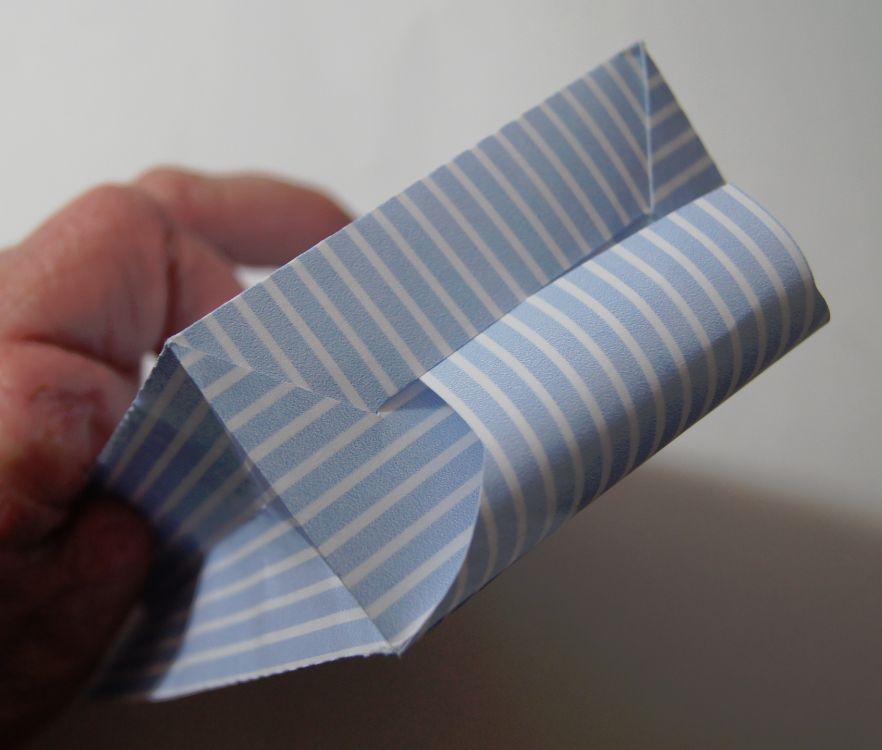
OK, bear with me and my funny looking flaps. I am trying to find the perfect bottom flaps - ones that will allow the bag to be closed without glue. This is not perfect but I.am.getting.close! You can see how I designed the flaps so that they interlock when closed. I know they look at little different...odd.....peculiar.....bizarre?? Not sure what to call them! But they do the job.
Here's how it works (excuse the photos of my left hand - yes I am missing fingers but there was no other way to get the photos so you will have to overlook my hand)

The flaps can be pulled out and the box/bag can be stored flat. The only glue needed is for the flap that attaches at the side. And of course any embellishments.
Pop the flaps back in and there you have it - A favor or treat bag fit fora king the World's Best Dad!
Waiting to be filled....got any good ideas? The Pink Girls are 8 and 9 years old, and one is very craftily-challenged. We will have about 10-20 minutes to complete the craft after Wednesday service so I have to find something quick, cheap, and easy! And of course, memorable for a dad.
Would you like to try this bag yourself? I have the bag available (free!) until June 25, download here. (And yes, it is the third revision of the file - I was really working on that bottom flap thingie).
As always, God Bless, Happy Crafting, and I would love to see what you make with my files!
And if you didn't see the latest specials from Lettering Delights (I know there are a few who don't "do" FB), here they are.
posted one that she was sharing. But I needed one more proportioned like a lunch bag, so I went ahead and designed my own. My bag is 3.5 x 4.75 x 1.5" (w x h x d).
OK, a little bit of cheatin' goin' on here - I wanted the design to be as big as possible on an 8.5 x 11" paper so I did not want to use PnC (the reg marks really eat into the design area).
So I made my design and then made a thick shadow around it and filled it with a pinstripe texture (that I designed and is included in this file). I kept the actual cuttable design white. Using this method you may even be able to get a decent Print-n-Cut with a cricut. I can assure that it works very well to get a larger design with a Cameo!
I drew the ties myself - I started with the pentagon shape and then did some node-editing magic (thank you so much, Andy, for adding node editing to MTC!) and voila! a tie appeared. I wanted it to be proportional so I actually designed it on the front page and then moved it to the second page for PNC (in the same cheatin' way!). I even cheated and punched out the tie tacs (the round things) with a punch - shame on me! (I found the saying "World's Best Dad" on google. I was not able to find any copyright info so I am not including it in the file. You can always make up your own or google it yourself).
I took the image into PSE and changed the light teal blue to a blue that matched my bag and tie better.
OK, bear with me and my funny looking flaps. I am trying to find the perfect bottom flaps - ones that will allow the bag to be closed without glue. This is not perfect but I.am.getting.close! You can see how I designed the flaps so that they interlock when closed. I know they look at little different...odd.....peculiar.....bizarre?? Not sure what to call them! But they do the job.
Here's how it works (excuse the photos of my left hand - yes I am missing fingers but there was no other way to get the photos so you will have to overlook my hand)
First side flap inserted.....
...starting to insert the second flap....
.....second side flap inserted.....
....inserting the last flap
...the result...a nice tailored-looking bottom that is relatively secure - and without glue!The flaps can be pulled out and the box/bag can be stored flat. The only glue needed is for the flap that attaches at the side. And of course any embellishments.
Pop the flaps back in and there you have it - A favor or treat bag fit for
Waiting to be filled....got any good ideas? The Pink Girls are 8 and 9 years old, and one is very craftily-challenged. We will have about 10-20 minutes to complete the craft after Wednesday service so I have to find something quick, cheap, and easy! And of course, memorable for a dad.
Would you like to try this bag yourself? I have the bag available (free!) until June 25, download here. (And yes, it is the third revision of the file - I was really working on that bottom flap thingie).
As always, God Bless, Happy Crafting, and I would love to see what you make with my files!
And if you didn't see the latest specials from Lettering Delights (I know there are a few who don't "do" FB), here they are.
Friday, June 1, 2012
These boxes are addicting...
...so I made another file.
This one has a scalloped edge on it. The texture is one that I had previously designed. I printed this out on 32# (heavy) paper that I picked up at Staples. It costs about the same as card stock (about 0.03 each) but the paper is easier to work with than card stock. But it is still heavy enough to hold up well. The paper also takes color ink well.
The MTC file can be downloaded here through June 15 (free).
This one has a scalloped edge on it. The texture is one that I had previously designed. I printed this out on 32# (heavy) paper that I picked up at Staples. It costs about the same as card stock (about 0.03 each) but the paper is easier to work with than card stock. But it is still heavy enough to hold up well. The paper also takes color ink well.
The MTC file can be downloaded here through June 15 (free).
Subscribe to:
Posts (Atom)