I'll be doing some crafting with
The Pink Girls for Father's Day - just not quite sure yet what. But I did get started with the gift bag. I saw
these on Pinterest and decided to design my own in MTC. But before I could, angelb (from the
MTC forum)
posted one that she was sharing. But I needed one more proportioned like a lunch bag, so I went ahead and designed my own. My bag is 3.5 x 4.75 x 1.5" (w x h x d).
OK, a little bit of cheatin' goin' on here - I wanted the design to be as big as possible on an 8.5 x 11" paper so I did not want to use PnC (the reg marks really eat into the design area).
So I made my design and then made a thick shadow around it and filled it with a pinstripe texture (that I designed and is included in this file). I kept the actual cuttable design white. Using this method you may even be able to get a decent Print-n-Cut with a cricut. I can assure that it works very well to get a larger design with a Cameo!
I drew the ties myself - I started with the pentagon shape and then did some node-editing magic (thank you so much, Andy, for adding node editing to MTC!) and voila! a tie appeared. I wanted it to be proportional so I actually designed it on the front page and then moved it to the second page for PNC (in the same cheatin' way!). I even cheated and punched out the tie tacs (the round things) with a punch - shame on me! (I found the saying "World's Best Dad" on google. I was not able to find any copyright info so I am not including it in the file. You can always make up your own or google it yourself).
I took the image into PSE and changed the light teal blue to a blue that matched my bag and tie better.
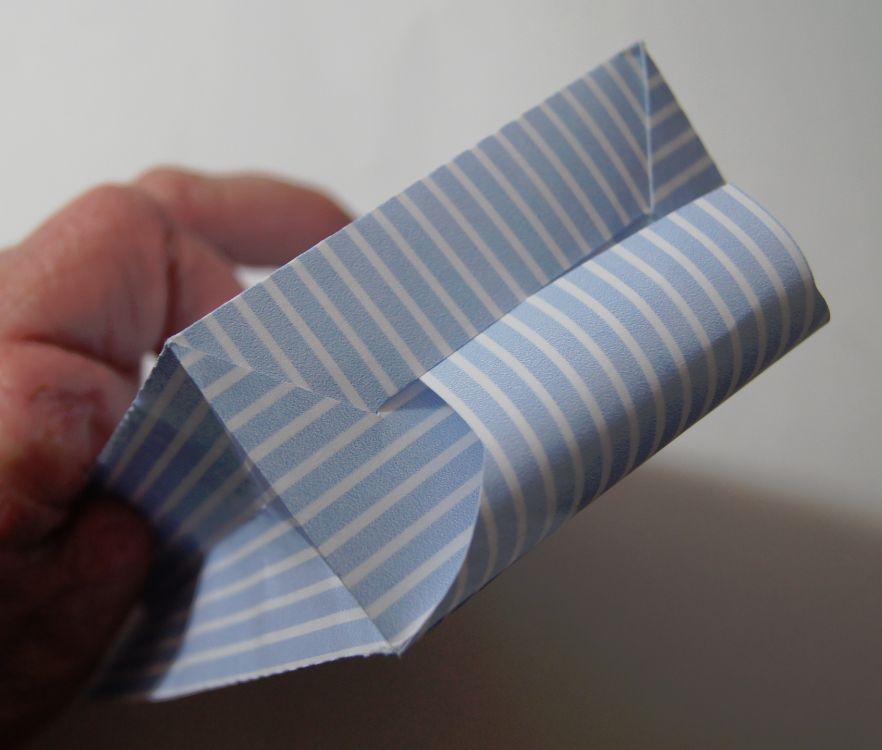
OK, bear with me and my funny looking flaps. I am trying to find the perfect bottom flaps - ones that will allow the bag to be closed without glue. This is not perfect but I.am.getting.close! You can see how I designed the flaps so that they interlock when closed. I know they look at little different...odd.....peculiar.....bizarre?? Not sure what to call them! But they do the job.
Here's how it works (excuse the photos of my left hand - yes I am missing fingers but there was no other way to get the photos so you will have to overlook my hand)

First side flap inserted.....
...starting to insert the second flap....
.....second side flap inserted.....
....inserting the last flap
...the result...a nice tailored-looking bottom that is relatively secure - and without glue!
The flaps can be pulled out and the box/bag can be stored flat. The only glue needed is for the flap that attaches at the side. And of course any embellishments.
Pop the flaps back in and there you have it - A favor or treat bag fit for
a king the World's Best Dad!
Waiting to be filled....got any good ideas? The Pink Girls are 8 and 9 years old, and one is very craftily-challenged. We will have about 10-20 minutes to complete the craft after Wednesday service so I have to find something quick, cheap, and easy! And of course, memorable for a dad.
Would you like to try this bag yourself? I have the bag available (free!) until June 25, download
here. (And yes, it is the third revision of the file - I was really working on that bottom flap thingie).
As always, God Bless, Happy Crafting, and I would love to see what you make with my files!
And if you didn't see the latest specials from Lettering Delights (I know there are a few who don't "do" FB), here they are.


2 comments:
Thank you Nelda! Love the file and it's fabulous as usual!
Love the file! thanks.
Post a Comment