Super cute - I already have these sets but they are a great buy if you do not already have them
Remember this card and this post? The card and tag were made with this set.
I have several affiliate links in both my posts and on the sidebar. All opinions are mine! Thanks so much for your support.
Showing posts with label Lettering DElights. Show all posts
Tuesday, August 2, 2011
Friday, July 8, 2011
Faith Lever Card
I am still exploring the possibilities of the Lever card designs from SVG Cuts. This one is for a sympathy card for a dear friend. I am not good at these, I always feel like I say or do the wrong thing. But my thoughts are right! Hopefully this will be OK.
I used a little bling to accent some spots.
There was a fine white line or edge to the cut-outs so I touched up the colors with a matching Copic marker to cover this and give dimension (LD almost always uses the basic Copic colors - I love coloring in with a complimentary color in the same tonal family). I added more dimension to the flat flowers shapes by rubbing them with an embossing tool. This really helped. Of course a rhinestone bling for the center. I also used Gelly Roll Stardust Clear pen on the flowers, the flourish and the word faith. (BTW if you are in the market for Copic markers, I included a link below).
I found an inspirational poem by Annie Johnson Flint "What God Hath Promised" to place on the inside.
I used the same papers as from the previous project (it was actually a trial for this one), Inch by Inch Paper Pack from Lettering Delights. The texture was resized using the method described here.
The blue color was color-matched from the blue in the paper by using the color picker tool in PSE. Ditto for the yellow and red hue. The white is actually an off-white taken from the paper as well.
Enjoy life - craft to the fullest! Thanks so much to all who sponsor me by purchasing through my links at the top of the blog - it helps with the cost of maintaining the blog and I appreciate it!
Oh yeah - Copic markers! I have been purchasing Copic Sketch markers one at a time, using the 40% off coupon at Hobby Lobby. This brought the price down to $4.29 (including tax). But there is a site I found that has them for $3.95 each, and free shipping if you purchase 13 or more markers (the price is listed as $4.87 but drops when you place the marker in your basket).
No tax if you live outside of California. I heard that the price of the markers was set to increase soon so I just made my first purchase at Carpe Diem Store. I am not affiliated with them in any way but like to pass on a good price if I find one!
Tuesday, July 5, 2011
Another level card...with a twisty turn
I love the lever cards from SVG Cuts, too cute! I tried out a different paper this time, I used the Inch by Inch Paper Pack this time (not on sale but some great colors) for a more peaceful version.
And the pinwheel just needs to turn, doesn't it? So I put it on a wobbly spring!
I made my own using this tutorial, with 26 gauge wire, 3/4" circles, and a glitter tube (about 7/16" diameter. But I think my Martha Stewart glue pen barrel may have worked as well).
I love the way the colors compliment each other - so easy with the Lettering Delights paper packs. And don't forget - many are on sale for 0.50 right now.
Wednesday, June 29, 2011
Gerber Daisy Border (free)
Another border to add to your collection. This one also includes a lace that can be threaded with a ribbon.
You can download the file here.
And there is an awesome bundle deal at Lettering Delights for their Two for Tuesday deal.. If you do not already have these sets, check out this great deal. It is a bundle worth $44 for just $5 until July 4. Check it out (image below if linked).
You can download the file here.
And there is an awesome bundle deal at Lettering Delights for their Two for Tuesday deal.. If you do not already have these sets, check out this great deal. It is a bundle worth $44 for just $5 until July 4. Check it out (image below if linked).
Tuesday, June 28, 2011
Creating textures for MTC from LD paper packs (revisited)
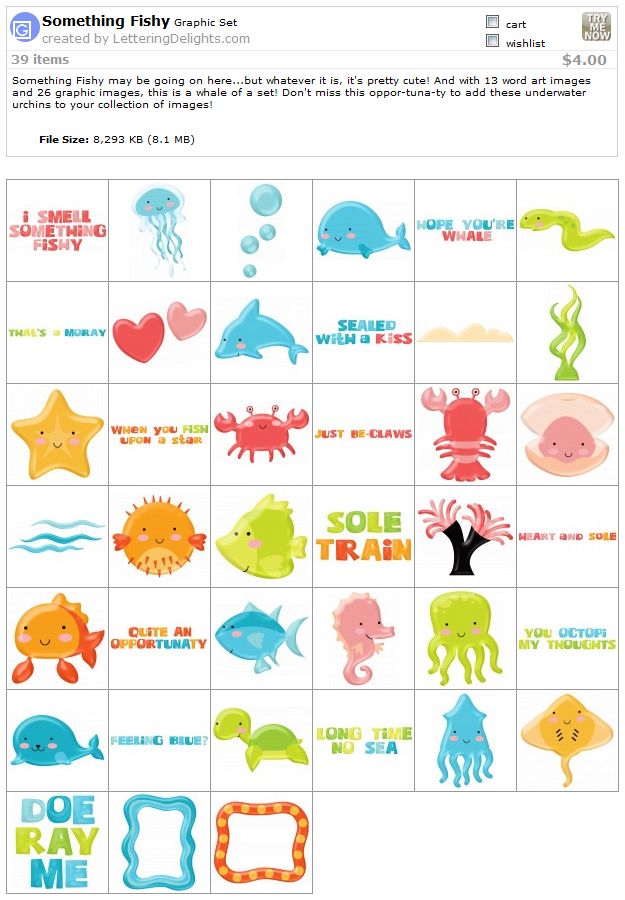
With all the cute paper packs at Lettering Delights (that match colors in the the graphics), I had been using this method to convert them to a usable file in MTC. But thanks to a comment by a reader (thank you cfine!) I have been doing it a different way on some of the papers. This does not produce a seamless texture. My method uses her idea but is a bit different.
This method does involve using PhotoShop Elements (PSE), but the other one did as well. You may be able to do this in other graphics programs (maybe Paint, or PSP).
Open the file in PSE. For this tutorial I am using the harlequin file from the Lettering Delights At Home Paper Pack.
Now go to Image-Resize-Image size. Change the numbers to get a usable result. I like to stay below 528x 528 pixels for MTC (even lower is better) but it is a compromise between your image quality and how much you will tax your system resource with the larger files. If I only have one texture, I will use close to 528. If I have more textures in a project, I tend to lower the pixel number. For this I chose 520 pixels, 4 inches and 130 dpi. Most of my projects are 4-5 inches or less, so this is the perfect compromise for me. You can alter to suit your needs.
I save it as a png and include the information (size and pixels).
For use in my project, I right click to bring up the menu for textures.
And navigate to where my texture is saved and open it.
Before applying the texture, I will re-size it using the scale option so that the texture is just a little bit larger than the shape. The mat that I am filling is 4.7559 x 3.6235. I enlarge the texture (using the slider and arrow keys) until it is 4.76" square.
Here is what my mat looks like after applying this texture.
I am now ready to cut! Do you notice more Lettering Delights sets in there? I totally mixed-and-matched this project. The Chinese Character is from DoodleBat DB KanjiWords A-G, the bamboo is from the Asia SVG (part of the new Cut Its Simple Shapes), and the paper is on sale! Stay tuned for a post of the card itself - I am getting ready to cut it now.
Speaking of sales, you did read my last post about all the 0.50 sale items at Lettering Delights? Try doing a search for Paper Packs, and start about halfway through - you will see gobs and gobs of sets on sale! Check them out - now you can easily use them within MTC! (image is linked)
Friday, June 3, 2011
Archiver's Coupon and Friday Freebie at Lettering Delights
If you are a scrapper. check out the free scrap pages at Lettering Delights this week!
And I have another Archiver's 30% off coupon. Remember they carry Silhouette mats and blades so this is a great savings!
Thursday, June 2, 2011
A Melon Thanks! (and a free texture)
OK, I admit that I love puns! And since I had this pun in mind, when I saw the new Backyard Fun graphic set and the SVG set at Lettering Delights, I knew I had to make another card using it.
I used the HP Premium Presentation Paper that I bought on sale at Best Buy last week. The paper handles color graphics awesomely - these pictures are straight out of the camera (they were resized) - no photo-shopping needed to get that vibrant color. Since this is a heavy paper - but not thick enough for the card base - I had 2 cut pages. Here is what the MTC page looked like, ready to print to the HP paper (of course I turned off "Outline shapes" for printing):
Yes! I even made watermelon seeds. They turned out great - don't you think they look like real seeds?
After cutting, the seeds I drew over them with my new Atyou Spica Clear twinkle pen, then dolloped them with Dimensional Magic. Then I cut the base out of plain white Georgia Pacific card stock. Both papers cut very well on the Silhouette.
Layering was easy - the watermelon and the Thanks! were popped up with foam squares. So pop on over to Lettering Delights to pick up one or both of these sets. You might want to check out the other new SVGs while you are there.
The green polka dot texture is on my own design and I am happy to share it with you. It is small enough to be used in MTC without slowing down your system. Download here.
Thursday, May 26, 2011
Under construction
Honk, honk! Beeep! Coming on through...
Boys and their toys! I needed a shower card for a new baby boy and thought this would work. I used the Big Truck graphic set from LD and came up with this.
And even though it was for a little boy, I needed a little bling....
The inside sentiment followed the construction theme.
I nabbed the feet off the internet and made up my own sentiment. If you have boys in your life, check out the Big Truck graphic set at Lettering Delights.
Tuesday, May 24, 2011
First cuts with the new Silhouette plug-in for MTC
Awesome work, Andy! He never fails to come through for us. We have been waiting for the beta version of the plug-in and here it is. And there's even more coming with the next version - Silhouette users will have their own mat and it will be even better. But I am a happy camper right now, as it is.
Andy has a screenr video cast here that discusses using the plug-in, check it out and them get started cutting!
And here (drum roll please...) are the results of my very first cut after watching the video.
This is graphic #8 in the Big Truck graphic set. I cut it at just a little over 4 inches. I was amazed at how well this was cut out - it was perfect (well, except for my mistake - more on that later). Even the little space between the cab and the dump bed was cut perfectly. Take a look at the graphic set and you will see that the outlines are every thin around the graphics. The trace is that good and the cut that accurate.
And notice with black window trim - it is about 1/32" wide (less than 1 mm), and it cut perfectly as well!
Oh yeah, above, you may be able to see that the black line is thicker where I've marked it wit red? Yeah, that's my goof-up. I placed a cut line to cut out the window and did not align it correctly (see below). Let's just say that a little Copic marker goes a long way in covering up some mistakes!
If you have a Silhouette (or another cutter) you need to check out Make The Cut software.
Just Be-Claws
Everybody is lovin' the new Something Fishy graphics from Lettering Delights. I just couldn't resist making a card with the little crab because it was so cute and would make a great "anytime" card. You can never have enough of those!
The paper was from the Something Fishy set as well. This shaped card was designed and cut in Silhouette Studio. But not to worry - the MTC plug-in for the Silhouette is coming soon - look for it in the next few days!
Here's the rest of the set - they are all so cute and cheerful. Grab yours today at Lettering Delights! There is a graphic set, an alphabet, a paper pack and an SVG set. You can pick up the collection like I did here. It's on sale for $6 right now - and don''t forget to use your coupon UndertheSea to get 40% off!
Monday, May 23, 2011
Thursday, May 19, 2011
Toadally Awesome...
...even if I do say so myself. This is another Riddle card for Dylan. I just fell in love with the cute little frog in the Frog graphic set and papers from Lettering Delights. The white that you see around the edges of the popped up pieces is actually the edge of the paper. The PnC is so awesome with the Silhouette cutter that I rarely ever see even a small margin around the image.
Here is the layout in Silhouette Studio for the card:
The inside has riddles on the left side to entertain Dylan.
Here is a link to the graphic set in case you would like to replicate the card.
Don't you just love this playful little froggy?
Yes, I did layer his tongue! I tried to use a wobbly on the fly to make him wiggle but it didn't look right so I ended up just using pop dots. Hope you have as much making this card as I did.
(PS: Andy,. I am still waiting for the Silhouette plug-in, hint, hint!)
Wednesday, May 18, 2011
Fish card
I just love LD's latest Something Fishy collection. I don't have it yet but I went searching through the files I do have and found this cute little fish in the Seven Seas graphic set. He looks like a Freddy, don't you think?
I designed this card in Silhouette Studio. It is a simple shaped card. The little guy was facing the wrong way (at least I thought so!) so I just mirrored him before making the shadows. I welded a rounded rectangle to the base shadow to get a flat bottom card with the shape to the side and top. Here is a screen shot of my SS layout:
And the card:
After I made this card, I changed some of the elements of the design, specifically the back shadow for little Freddy. I also added the hat so that I could pop it up next time. Here is the new design:
For the final card I could not resist giving Freddy some goggle eyes! He has such a happy personality that they fit him well.
I found some pop-up squares that are not quite as thick so I was able to layer both the blue background as well as Freddy himself. A little Glossy Accents on his hat and he is ready to go swimming off, hopefully to add some cheer in a little boy's day. I added fish riddles inside (This card is for Dylan, you can check out one card drive for him here: http://dustinpike.blogspot.com/2011/05/freebie-and-call-for-cards.html).
Subscribe to:
Posts (Atom)


