Really, it is easy. Just use a simple formula and they will turn out well.
First select a shape that will be swung or flipped. The shape does need to be symmetrical - if you can fold it down the middle top to bottom and both sides are the same - it will work. Shapes like circles, hearts, diamonds, bracket frames., etc will all work.
In this case I am going to use a shape from the Basic Shapes to make a symmetrical design for the Swing/Flip area. I used the heart shape to make an eight-petaled flower.
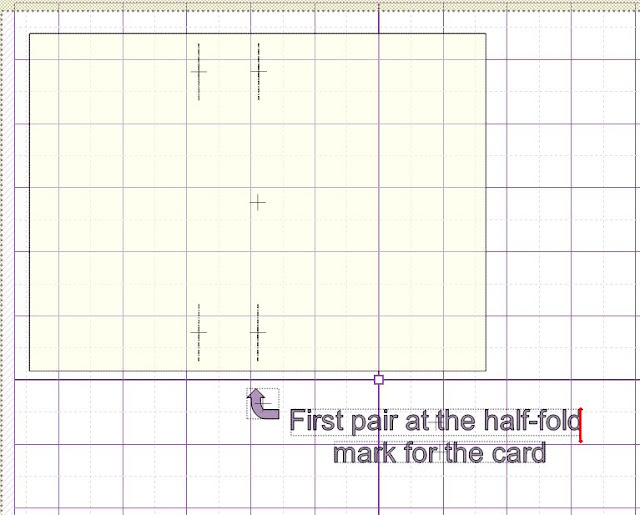
Now that you have your shape, let's set it aside for a moment to work on the card base (move it to another layer and close the eye). I used 8.5 x 5.5 size rectangle as my card base but you can alter the size. Using the node-editing functions of MTC (the W key brings this up), make a short vertical line anywhere on your page. Duplicate and move the copy above the first. Position these over the middle of your card base. Select both and change to a dashed line. The length is not important at this point but it does need to be a set of 2 lines. It should look something like the first set of lines below.
Now duplicate this set of lines and move the second set to the left about 1/2". This will be the Z-fold part of the card. You can experiment with the depth but I have found 1/2" to be a pleasing distance.
Now open the eye on the flower shape. Center the flower vertically over the second (left) set of dashed lines and horizontally with the entire card base. It should look like the image below, more or less.
OK, let's adjust the dashed lines to work with out swing/flip shape (the flower). Just use the arrow keys to resize them so that they do not overlap the swing/flip shape.
The card base as a whole will look like this after resizing the dashed lines.
If you have used my swing/flip card files before, this should look familiar. Now we need to edit the flower cutting line so that it does not the cut the parts between the dashed lines. Use the W key (or any of the other ways) to bring up the node-editing side bar. I usually zoom in on the area at this point so I can edit more accurately. Break the flower at the 2 points where the dashed line would meet it at the top (the shape will loose its color). Do the same for the bottom. (If you are unfamiliar with the node-editing tools, please read the MTC manual for additional information.)
Exit the node-editing tool bar and select, then split the swing/flip shape. You should see that here are now 4 lines than make up the flower shape, like below.
Select and delete the lines between the dashed lines.
Your swing/flip card is completed! It should look something like this.
Now add other embellishments, inset shadowing or other designs to your heart's desire to dress up your swing/flip card.
As I said above, you can use any symmetrical shape for the swing/flip shape. Give it a try and see what you come up with! If you would like the basic card base file (no swing shape), you can download it here.


.JPG)


3 comments:
Thank you so much for sharing this tutorial. It is so much easier to learn with a tutorial, and step by step directions.
Fantastic tutorial and design. I've been looking at card designs all evening...this was the only one I could find for digital cutter. WELL DONE.
PS. what is the lovelty font you are using for your blog??
Thank you for your kind comment! The font is a simple one offered by blogger. Sometimes it defaults ( I think it depends on your computer) to a script-like font. I wonder if that is what you are seeing? Neither are installed on my computer but are offered by blogger.
Post a Comment