
To refresh your memory, here is the card that we are making (with some minor alterations).


And check the box

You should now have a boundary box that shows your printer margins. On the top and left side, these are almost the same as the "no-cut" zone boundaries, which is nice for me!

I plan to use a pre-made card base for this card, which measures 5.5 x 4" folded. If I allow for a 1/8" spacing around the sides, I will need a background mat (the pink in the above photo) that is approximately 3.75 x 5.25. So let's draw a box that size. Using Basic shapes, double-click on the square.

Now, with the lock open (green), change the size of the square to 3.75 x 5.25. Be sure to click enter to make the changes effective. I also realized I was on the "Contrast" setting, so I changed it to "green".

For the flower, I brought the flower in from the DB Floragraphy font. Import using the "Add font from File" button and choose DB Floragraphy.

Scroll down to find the rose-like flower. Double click to import it onto the mat, then click the plus sign to put it on its own layer.

More the rose flower over the base rectangle and enlarge it to a pleasing size. Don't worry if it is bigger than the background mat, we will fix that in the next step.

Make a copy of the background mat, and paste it in place to the layer with the flower. Then turn off the eye to the background mat layer.

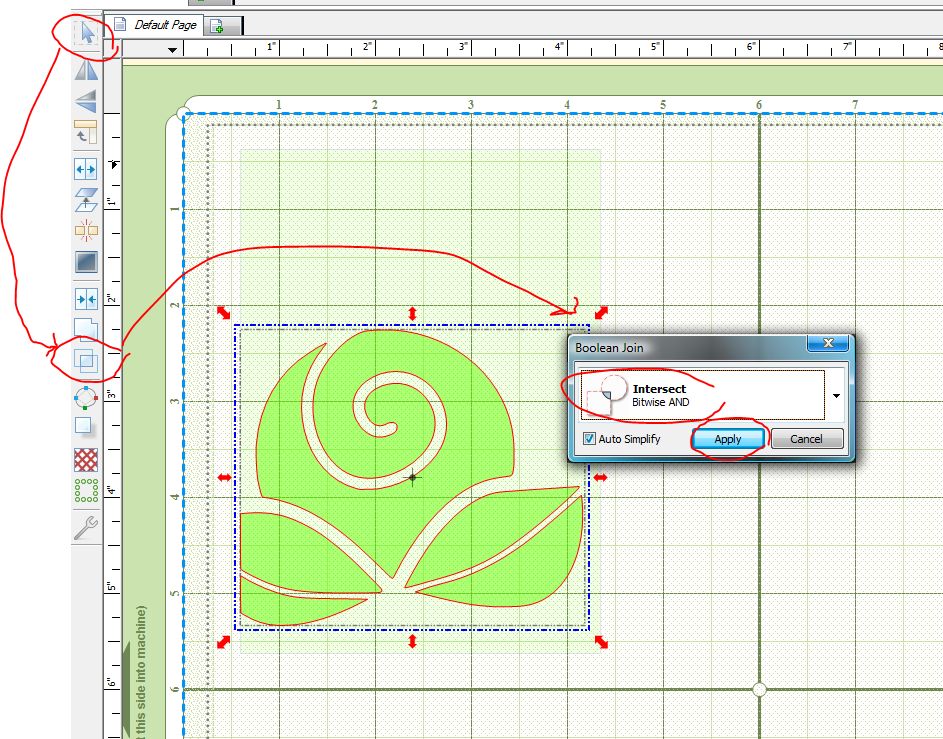
Select all (use the button), and then click the Boolean Join button. The option that you will want is "Intesect". Click "Apply".
You now have the all the shapes needed to make the card. Move the flower shape away from the area that the background mat occupies. Choose Split (or Break) and place the flower on a different layer than the leaves.

Move the leaves down just a little. Open the eye on the background mat layer. Now select all and add a 1/8th" (0.1250) shadow to these shapes.

Select the shadow layer and break (we will be coloring them differently so they need to be broken). Click off these to de-select them and then draw a box around both the background mat and its shadow. Right-click and apply a texture.

I used a Texture form the Love is Sweet paper pack. (I actually resized the texture in Adobe Photoshop Elements so that it was smaller and would not tax my system resources. If you want to learn how to do this, it can be demonstrated in another tutorial.)

If desired, scale the texture to a pleasing scale.

Notice that the texture is applied to both shapes. Remember that we will print the shadow shapes and cut the others. So if the textures do not line up perfectly it is not a problem. Apply a texture or color to the flower and the leaves.

I scaled the texture down to 40% for the leaves. You may not need to.

All that remains is adding the sentiment. Since this will be printed (not cut) it should be pl;aced on the shadow layer. The easiest way to do this to lock (or turn off the eyes) to the other layers and add it in. Size it as desired.

You are now ready to print out your design.Turn off the eyes to all layers except the lowest (shadow) layer. Make sure "outline shapes" is NOT checked. Notice that all shapes are within the printer margins. Print this.

For cutting, load the paper onto the mat and into the cutter. Turn off the eyes to the bottom (shadow) layer and open them on all others. You are ready to cut! After cutting, just layer the pieces so they look like the card above and adhere with adhesive. You're done!
These steps are not written in stone - you can do things in a different order or in a slightly different way and get the same result but this should be a starting place.
6 comments:
Thanks for the tutorial Nelda! I tried this and it worked perfectly! First time I tried using texture with print and cut. Liked your technique of cutting the smaller image out of the bigger shadow layer--gives you the "wiggle room" you need for the "print and cut" step! I'll show you a picture on the MTC forum! :-)
thanks again,
Ann
Thank you Nelda! I just learned several different things in MTC.
Karen3912
WOW, excellent tutorial. I also learned some new things and I have been using MTC since its inception. Thank you so much and yes, I would love a another tutorial on how to round the corners and also on sizing textures and even where you find the best ones. You are an excellent teacher. Thank you so much.
Colleen in LI,NY
Colleen, the textures tutorial is here: http://papercraftingwithnelda.blogspot.com/2011/02/how-to-convert-lettering-delights-paper.html
As far as textures, I do use the Lettering Delights papers a lot because the colors are so wonderful. But you can make textures (polka dots, stripes) easily in Photoshop Elements. And try doing a Google search for "seamless textures" and you will find a plethora of options!
Thanks so much for this tutorial!! You make it look so easy. I am looking forward to giving it a try!
Thank you! I'm going to try this soon!
Post a Comment